前言
欢迎来到菜鸟SpringCloud实战入门系列(SpringCloudForNoob),该系列通过层层递进的实战视角,来一步步学习和理解SpringCloud。
本系列适合有一定Java以及SpringBoot基础的同学阅读。
每篇文章末尾都附有本文对应的Github源代码,方便同学调试。
Github仓库地址:
https://github.com/qqxx6661/springcloud_for_noob
菜鸟SpringCloud实战入门系列
你可以通过以下两种途径查看菜鸟SpringCloud实战入门系列:
- 关注我的公众号:Rude3Knife 点击公众号下方:技术推文——SpringCloud
- 菜鸟SpringCloud实战入门专栏导航页(CSDN)
前文回顾:
- [菜鸟SpringCloud实战入门]第一章:构建多模块的Maven项目+创建注册中心Eureka子模块
- [菜鸟SpringCloud实战入门]第二章:创建服务提供者并在Eureka进行注册
- [菜鸟SpringCloud实战入门]第三章:将Eureka改造为高可用集群
- [菜鸟SpringCloud实战入门]第四章:远程调用服务实战
- [菜鸟SpringCloud实战入门]第五章:熔断器Hystrix的使用 + 可视化监控Hystrix Dashboard和Turbine
- [菜鸟SpringCloud实战入门]第六章:配置中心Spring Cloud Config初体验
- [菜鸟SpringCloud实战入门]第七章:配置中心客户端主动刷新机制 + 配置中心服务化和高可用改造
- …更多文章请查看上方:菜鸟SpringCloud入门实战专栏导航页
实战版本
- SpringBoot:2.0.3.RELEASE
- SpringCloud:Finchley.RELEASE
—–正文开始—–
通过消息总线Spring Cloud Bus更新客户端配置文件(使用Kafka)
前文提到,如果需要客户端获取到最新的配置信息需要执行refresh,我们可以利用webhook的机制每次提交代码发送请求来刷新客户端,当客户端越来越多的时候,需要每个客户端都执行一遍,这种方案就不太适合了。使用Spring Cloud Bus可以完美解决这一问题。
Spring bus的一个核心思想是通过分布式的启动器对spring boot应用进行扩展,也可以用来建立一个多个应用之间的通信频道。目前唯一实现的方式是用AMQP消息代理作为通道,同样特性的设置(有些取决于通道的设置)在更多通道的文档中。其实本质是利用了MQ的广播机制在分布式的系统中传播消息,目前常用的有Kafka和RabbitMQ。
以下是本文即将实现的架构:
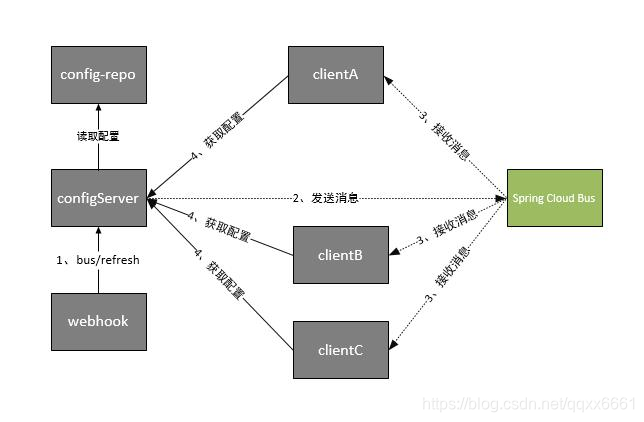
更新客户端配置文件整个流程是:
- 提交代码触发post请求给bus/refresh
- server端接收到请求并发送给Spring Cloud Bus
- Spring Cloud bus接到消息并通知给其它客户端
- 其它客户端接收到通知,请求Server端获取最新配置
- 全部客户端均获取到最新的配置
安装kafka
请参考我的文章:
https://blog.csdn.net/qqxx6661/article/details/88675520
与config-server模块进行整合
config-server模块在上一章有介绍
添加依赖:
1 | <dependency> |
修改配置文件,添加kafka配置:
springboot2中只需要这一句,不足要zk-node等设置啦。
1 | # kafka |
完整配置文件如下:
1 | server: |
与config-client模块进行整合
服务端设置好了总线,客户端当然也要和总线连接
依赖和配置文件的修改,与config-server一模一样,照着上面修改就可以了。
测试运行
分别运行eureka,config-server和config-client模块,这里我们开启两个config-client模块,分别对应端口8771,8772.
启动后的进程结构如下:
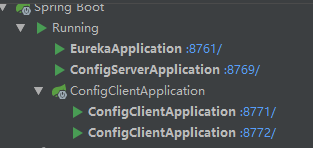
可以看到eureka里注册了服务端和两个客户端:

我们直接访问config-server,查看服务端现在的配置文件:
http://localhost:8769/spring-cloud-config-dev.properties
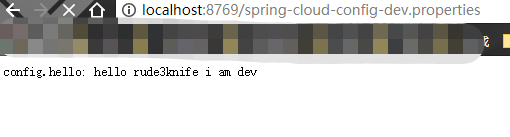
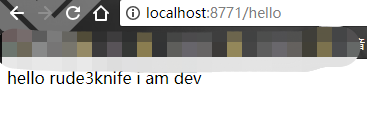
查看config-client的hello接口,得到配置文件内容:
接下来,将配置文件修改一下,加点字符。
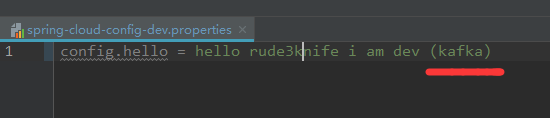
随后push到远程服务器。
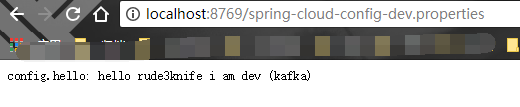
然后访问 http://localhost:8769/spring-cloud-config-dev.properties :
发现已经服务端更新了。
这时候,我们需要做更新,发送POST请求:
1 | curl -X POST http://localhost:8769/actuator/bus-refresh |
这是springboot2的请求,和老的请求格式不同,可以从进程启动时候的mapping日志中看出。

这时候请求 :
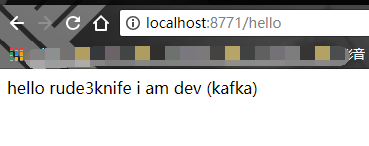
更新成功!
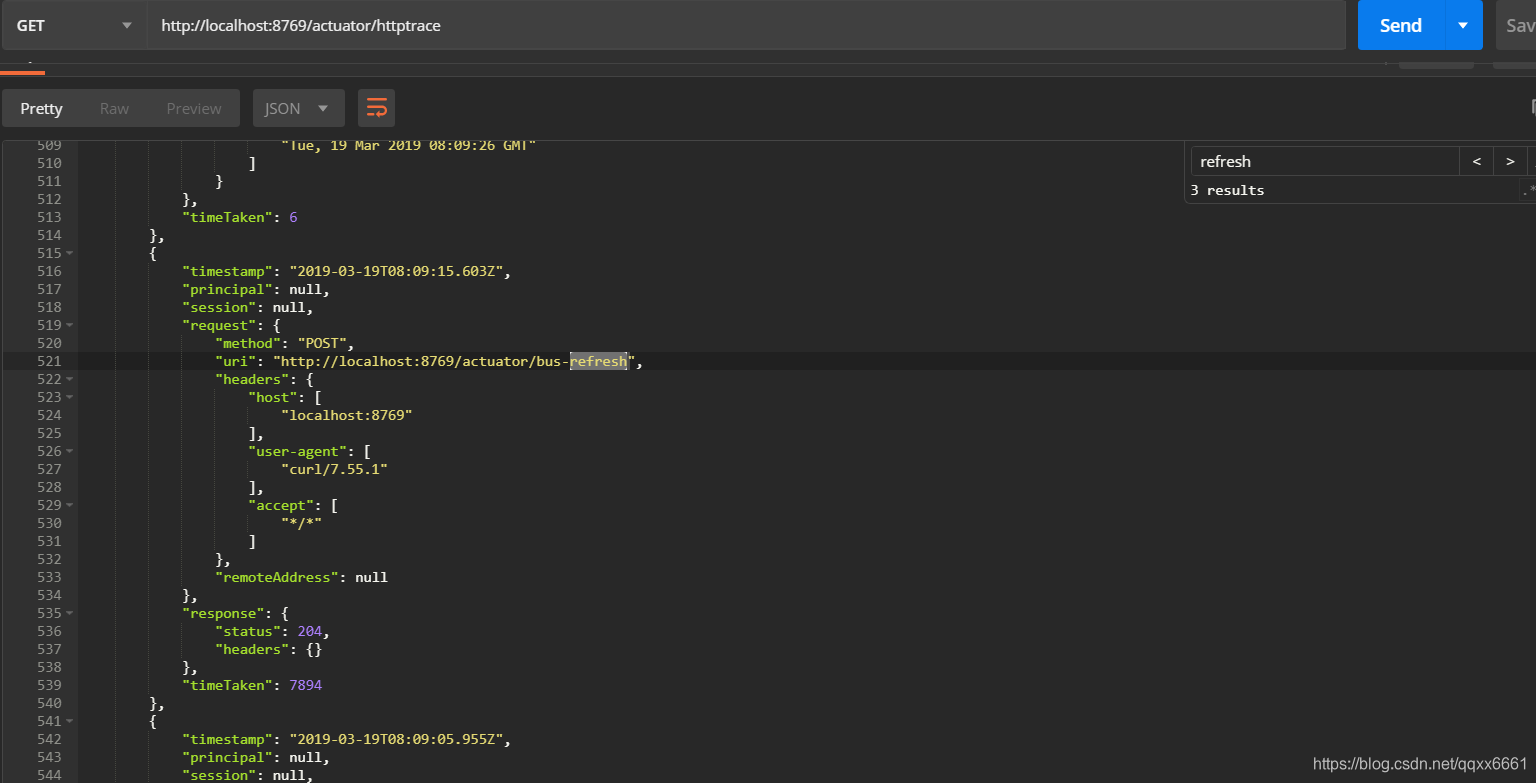
你还可以通过trace来跟踪总线事件:
一些场景下,我们可能希望知道Spring Cloud Bus事件传播的细节。此时,我们可以跟踪总线事件(RemoteApplicationEvent的子类都是总线事件)。
1 | http://localhost:8769/actuator/httptrace |
本章代码
https://github.com/qqxx6661/springcloud_for_noob/tree/master/08-spring-cloud-bus
参考
http://www.ityouknow.com/springcloud/2017/05/26/springcloud-config-eureka-bus.html
https://blog.csdn.net/superdangbo/article/details/78776532
https://mp.weixin.qq.com/s/aZvrYpsWiTuV9R_TfjBGpg
—–正文结束—–
菜鸟SpringCloud实战入门专栏全导航:通过以下两种途径查看
- 关注我的公众号:Rude3Knife 点击公众号下方:技术推文——SpringCloud
- 菜鸟SpringCloud实战专栏(CSDN)
关注我
我是蛮三刀把刀,后端开发。主要关注后端开发,数据安全,爬虫等方向。
来微信和我聊聊:yangzd1102
Github个人主页:
原创博客主要内容
- Java知识点复习全手册
- Leetcode算法题解析
- 剑指offer算法题解析
- Python爬虫相关技术实战
- 后端开发相关技术实战
- SpringCloud实战
同步更新公众号及以下全部博客:
1. Csdn
2. 知乎
https://www.zhihu.com/people/yang-zhen-dong-1/
3. 掘金
https://juejin.im/user/5b48015ce51d45191462ba55
4. 简书
https://www.jianshu.com/u/b5f225ca2376
个人公众号:Rude3Knife

如果文章对你有帮助,不妨收藏起来并转发给您的朋友们~